How to Cut Cement Tiles
The LiLi Guide to Cutting Cement Tiles
(and Brass and Terrazzo Tiles, Too!)
It is oh-so satisfying when everything lines up just perfectly. But when it comes to laying tile, you need to make a few cuts to get that perfectly aligned satisfaction. However, cutting into our cement, metal inlay, or terrazzo tile can be a little intimidating if you’re doing your first DIY tile job. Don’t worry. We have some “cutting-edge” techniques to help you out! Learn how to cut cement tiles (as well as brass and terrazzo tiles) with a bit of help from the LiLi Tile Team.
How to Cut Cement Tiles Like a Pro
To cut cement tiles effectively, use a wet tile saw equipped with a diamond blade. Measure and mark your cement tile, then carefully proceed to wet-cut for precise edges. When you need to cut tile for corners, miter cuts ensure a neat joint.
Follow our 6 steps to learn how to cut cement tiles like a pro.
Pre-Planning Your Cuts
Don’t break out the saw just yet. Take the following steps to pre-plan your cuts for success.
1. Consider the Pattern Run and Scale
Our LiLi cement tile collections are known for their vibrant and unique patterns. However, cutting a patterned tile is trickier than cutting a solid one. If you choose a bold design, you need to consider how it will look when cut. For example, tiles from our Canine Collection might look funny if you slice the pup in half! In some cases, you may be able to purchase smaller tiles or mix in solid tiles to prevent making awkward cuts that could affect the look of the pattern. You may also consider changing the size of the span where you can. For example, you could increase the size of a fireplace surround design to accommodate full-sized tiles without cuts.

2. Plan Corner Joints Ahead of Time
You need to plan out corner joints ahead of time when tiling walls or floor borders. While solid tiles will seamlessly flow together, patterned tiles need to line up perfectly. Otherwise, it could create a disjointed appearance. Lining up corner joints is trickier than it looks, especially for first-time DIYers. So plan ahead and make a few test cuts if necessary.
3. Preview the Look with a Dry Lay
In a tile dry lay, you will lay out the tiles on the floor without permanently fixing them in place. Dry laying allows you to preview how the tiles look and plan for any cuts that need to be made. If there are any issues, you can address them before making any permanent decisions!
Cutting Your Cement Tile
You did the planning. Now it’s time to make the cut.
4. Measure Carefully
You know the old saying, measure twice and cut once! So take careful and precise measurements to prevent having to redo cuts and waste product. After all, our tiles are too beautiful to waste, right?
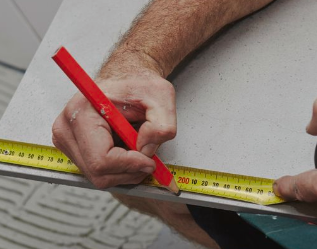
5. Mark Your Cut
Carefully mark your cut with a pencil or chalk to create a guide. This is not the time to eyeball it or make your best guess here!

6. Wet Cut the Tile
LiLi tiles are 1/2 inch thick and must be wet-cut to prevent damage to the tile and dust buildup in your space. Use a wet-cut tile saw with a strong diamond blade to make your cuts. Bringing in heavy machinery is necessary, especially if you’re tiling a large area with lots of corners.


How to Cut Metal Insert Tiles
The LiLi Metal Insert Collection features our classic cement tiles with brass or copper inlays for a little extra shimmer. As you may imagine, cutting through metal presents some additional challenges. However, we have two methods for you to consider.
Option 1: Use Cement Tiles without Metal Inserts at Cut Points
Many of our Metal Insert tiles have plain versions without the inlay. For some cuts, it may be beneficial to use a solid cement tile to avoid any installation challenges, especially on projects with a lot of cuts.

Option 2: Invest in the Right Tools
If you are all about the brass, don’t fret. It just takes the right tools to make the cut. Tile installation expert Allison Walton of Legacy Tile LLC has installed and cut through all types of tiles, including our Metal Insert tiles. She recommends using two different blades to cut through the cement and metal sections of the tile. While switching out blades mid-cut may take some extra time, the results will be worth it! To cut through metal, she suggests using the Montolit Perfetto Blade. While this blade is slower than some, it guarantees a crisp finished edge. Allison notes that sometimes the metal inlays can pop out due to the water and vibrations of the saw. However, it’s no cause for worry. Simply save the metal insert and reattach it with a bonding agent once the tiles are installed. Then proceed with grouting and sealing.
Watch Us Cut a Brass Inlay Cement Tile
How to Cut Terrazzo Tiles
Terrazzo tiles have chunks of aggregate running through the surface to create a unique pattern that adds a little extra shimmer and color. While these tiles have an additional material running through them, the process of cutting them is the same as our cement tiles. However, since the design is abstract, they are easier to cut because you don’t have to worry about lining up the pattern.

Know When to Call in the Experts
If you still don’t feel confident going into your DIY project, consider calling in the experts. Cement tiles can be complicated to cut and install. While durable, they are porous and susceptible to damage if not handled properly. Protect your investment and rely on professional expertise when needed.
Need More Help with Your Cement Tile Installation?
If you’ve made the cut, then it’s time to move on to the next phase of cement tile installation. Here are a few additional resources to check out on your DIY journey.
Get a DIY pep talk and inspiration from Rachel Metz.
Learn how to grout your cement tile.
Maintain and clean your cement tile after installation.
Learn more about our unique tiles and get product recommendations.
Shop the Collections
Make sure to follow us on Instagram for more tile trends and design tips. Need some extra help? Give us a call! We love sharing our thoughts on the latest trends and answering any cement tile questions you have.
Leave a comment